Install ISS
1) Open the Control Panel. Using the mouse, double-click on the Add/Remove Programs Applet. (See Below!)

1) Open the Control Panel. Using the mouse, double-click on the Add/Remove Programs Applet. (See Below!)

2) Using the mouse, push/select Add/Remove Windows Components button on the left. (See Below!)


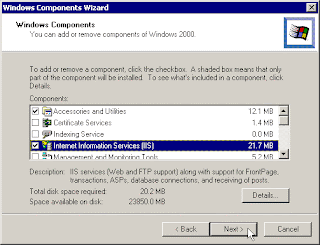
3) Using the mouse, check Internet Information Services (IIS) box. Using the mouse, push/select the Next button. (See Below!)
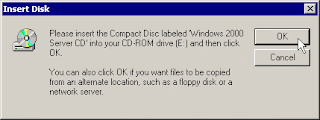
4) Insert the server 2000 CD into the CD-ROM or direct it to install from C:\I386. Using the mouse, push/select the OK button. (See Below!)
5) This should take a few minutes. (See Below!)

6) Using the mouse, push/select the Finish button. (See Below!)

Open/Configure The Internet Information Services Managerl


3) Using the mouse, select the Default Web Site in the IIS Tree. (See Below!)

3) Once the default web site is selected, the Stop Item is possible at the top (See Below!) The Triangle to the left of stop item is disabled/gray because the Default Web Site Service is already running. (See Below!)

4) Select the properties Tab. We need to discuss some of the Default Web Site options. (See Below!)

5) You need make no changes on the Web Site tab. I recommend leaving port 80 [default] as the listening port for web applications. You may limit the number of connections or the connection duration on this tab as well. (See Below!)

6) The performance tab enables you to fine tune your site in accordance with the number of hits you expect per day. The higher your selection, the more resources are allocated to your web site functionality. (See Below!)

7) The Home Directory tab enables you to select the location for the web site. By default, this will be on the Winnt installation drive in a folder called Inetpub. This may be moved to another drive or computer. I recommend permitting Directory Browsing initially; you can come back and tighten this security after you get the feel of managing IIS. Our applications will need Read and Write permissions. (See Below!)

8) Add index.asp, index.php, and index.html to your Document tab. Move them to the top. See Below!

9) You need do nothing on the Directory Security tab. (See Below!) Using the mouse, select/push the Apply button and close the Properties applet.

Verify The Service Using The Computer Management Console
1) Start the Computer Management Console. Using the mouse, right-mouse click on My Computer --> Select Manage. (See Below!)

2) Using the mouse, Expand Servics and Applications in the Management Tree on the left. (See Below!)

3) Using the mouse, select Service in the Management Tree. Note that IIS Admin Service is Started and will be automatically started in the future. (See Below!)

The Real Proof Is To Use The Server To Return A Browser Page.
1) Create a Quick and Dirty Web Site in a text editor.

2) Save this page as Index.html in your web page path directory. (See Below!)

3) Open the browser of your choice. Localhost is the default web site. Go to http://localhost or http://localhost/index.html.
4) Since your web server is listening for request on port 80, you should also be able to connect with either http://localhost:80 or http://localhost:80/index.html.

4) Insert the server 2000 CD into the CD-ROM or direct it to install from C:\I386. Using the mouse, push/select the OK button. (See Below!)

5) This should take a few minutes. (See Below!)
6) Using the mouse, push/select the Finish button. (See Below!)
Open/Configure The Internet Information Services Managerl
1) Using the mouse, hold down the Start Menu --> Select Administrative Tools [From Where-Ever you have it installed] -> Select Internet Services Manager. (See Below!)
2) Use the mouse to expand the IIS Tree by clicking the plus sign on the left. (See Below!)
3) Using the mouse, select the Default Web Site in the IIS Tree. (See Below!)
3) Once the default web site is selected, the Stop Item is possible at the top (See Below!) The Triangle to the left of stop item is disabled/gray because the Default Web Site Service is already running. (See Below!)
4) Select the properties Tab. We need to discuss some of the Default Web Site options. (See Below!)
5) You need make no changes on the Web Site tab. I recommend leaving port 80 [default] as the listening port for web applications. You may limit the number of connections or the connection duration on this tab as well. (See Below!)
6) The performance tab enables you to fine tune your site in accordance with the number of hits you expect per day. The higher your selection, the more resources are allocated to your web site functionality. (See Below!)
7) The Home Directory tab enables you to select the location for the web site. By default, this will be on the Winnt installation drive in a folder called Inetpub. This may be moved to another drive or computer. I recommend permitting Directory Browsing initially; you can come back and tighten this security after you get the feel of managing IIS. Our applications will need Read and Write permissions. (See Below!)
8) Add index.asp, index.php, and index.html to your Document tab. Move them to the top. See Below!
9) You need do nothing on the Directory Security tab. (See Below!) Using the mouse, select/push the Apply button and close the Properties applet.
Verify The Service Using The Computer Management Console
1) Start the Computer Management Console. Using the mouse, right-mouse click on My Computer --> Select Manage. (See Below!)
2) Using the mouse, Expand Servics and Applications in the Management Tree on the left. (See Below!)
3) Using the mouse, select Service in the Management Tree. Note that IIS Admin Service is Started and will be automatically started in the future. (See Below!)
The Real Proof Is To Use The Server To Return A Browser Page.
2) Save this page as Index.html in your web page path directory. (See Below!)
3) Open the browser of your choice. Localhost is the default web site. Go to http://localhost or http://localhost/index.html.
4) Since your web server is listening for request on port 80, you should also be able to connect with either http://localhost:80 or http://localhost:80/index.html.
----------------------- ------------------ ------------------- ---------------------- ......................
